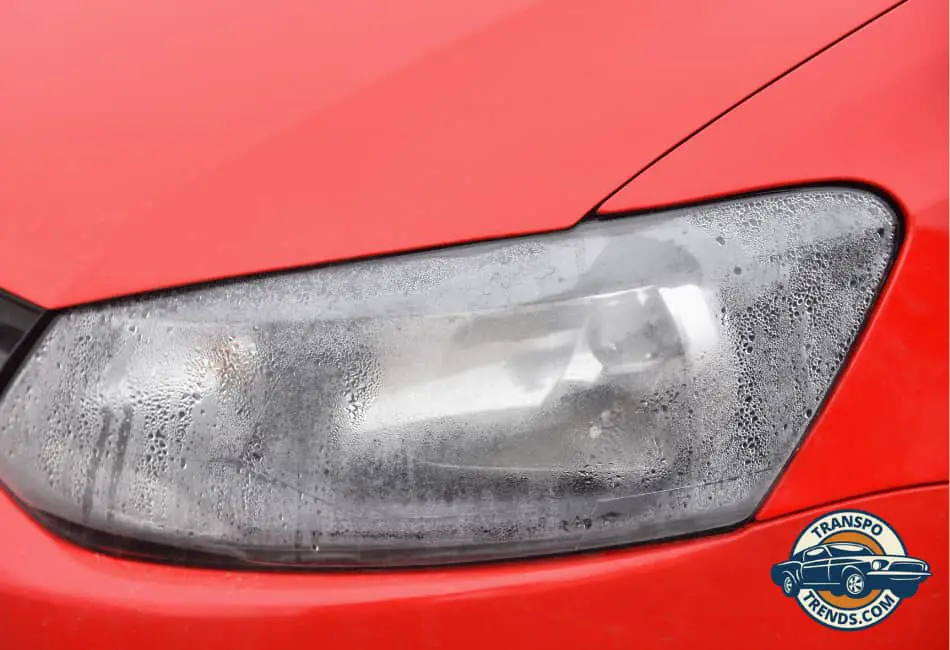
Headlight condensation in cold weather is an often overlooked car issue, which, if not properly addressed, can lead to reduced visibility and potential safety risks on the road.
This phenomenon occurs when the ambient temperature inside the headlight assembly falls below the dew point, causing moisture to condense on the inner surface of the headlight lens.
It is essential to address this issue promptly to avoid further complications such as foggy headlights, corrosion, or electrical issues.
In the remaining parts of this article, I will delve into the nine most common causes of headlight condensation in cold weather, each accompanied by their respective solutions, to help you maintain optimal headlight functionality and longevity as a car owner.
1. Temperature Fluctuations
Significant and rapid temperature fluctuations are another common cause of headlight condensation.
When an automobile is subjected to alternating cold and warm environments—such as moving from a heated garage into the chilly outdoors—the air inside the headlight assembly can quickly cool down.
As the air cools, it contracts, and its capacity to hold moisture decreases, causing the excess water vapor to condense on the headlight lens’s cooler surfaces.
- thoroughly inspecting and maintaining
Managing headlight condensation due to temperature fluctuations primarily involves thoroughly inspecting and maintaining the headlight seals and gaskets.
These components ensure a nearly airtight environment, reducing the volume of moist air that can enter the headlight assembly.
Regularly checking these seals and gaskets for signs of wear and tear and replacing them as needed can help maintain the optimal internal environment in your headlights, preventing the condensation that can occur with rapid temperature changes.
2. Moisture in the Headlight Housing
Moisture in the headlight housing forms another common reason for headlight condensation, especially in cold weather.
- Identifying Signs of Existing Moisture in the Housing
Signs of existing moisture in the headlight housing can be subtle and might easily go unnoticed if not consciously looked for.
One clear indication of moisture is the presence of fog or mist inside the headlight assembly. In case of significant moisture accumulation, water droplets or even puddles may be visible within the headlight housing.
Another sign is a decrease in the brightness or range of the headlight beam caused by water particles scattering the emitted light.
- Fix: Properly Drying Out the Headlight Assembly
Addressing moisture in the headlight housing requires careful drying out of the assembly.
Begin by removing the headlight, which varies across car makes and models.
Once removed, you can use compressed air to force out the moisture or a hairdryer on a low heat setting to evaporate it.
Be careful to avoid overheating the assembly, as it can cause damage. After drying, reinstall the headlight, and, moving forward, be sure to check regularly for signs of moisture in the housing.
3. Damaged or Worn-Out Seals
Headlight seals and gaskets play a crucial role in keeping moisture out. However, they can become worn out or damaged over time, allowing moisture to infiltrate the headlight housing and cause condensation.
- Inspecting Seals and Gaskets for Signs of Damage
To maintain optimal headlight performance, inspecting the seals and gaskets routinely is essential. Signs of wear or damage may include visible cracks, deformation, or brittleness.
Additionally, if moisture or condensation inside the housing becomes a recurring issue despite regular checks and drying efforts, this could indicate a problem with the seals or gaskets.
- Fix: Replacing Damaged Seals and Gaskets
If you find any signs of damage during your inspection, prompt replacement of the affected seals or gaskets is the best course of action.
This process can vary greatly depending on the make and model of your vehicle, so it’s often best to consult your car’s manual or a trusted mechanic for specific guidance.
After replacing these components, your headlights should be better equipped to resist moisture intrusion and the consequent issues it creates.
Regular future inspections will help ensure the longevity of your headlights and their optimal performance.
4. Poorly Sealed Seams
Sealing seams in headlight assemblies plays a critical role in preventing moisture from entering and causing issues like fogging or electrical malfunctions.
- Understanding the Importance of Sealed Seams in Preventing Moisture Entry
Headlight assemblies are designed with precise seams to prevent moisture intrusion. However, these seams can occasionally be poorly sealed, especially in older or heavily used vehicles.
This issue is less about wear and tear and more about the manufacturer’s quality or potential mishaps during installation or maintenance.
When seams are not completely sealed, moisture can infiltrate the headlight housing, leading to the undesirable outcomes mentioned earlier.
- Fix: Identifying and Sealing Gaps Using Appropriate Sealant
If you suspect that poorly sealed seams might be the source of your headlight moisture problems, identifying and sealing these gaps is crucial.
Start by thoroughly examining your headlight assembly for any visible gaps or holes. If you find any, an appropriate automotive sealant can be used to remedy the problem.
Apply the sealant carefully along the unsealed or poorly sealed seams, making sure to wipe away any excess to ensure a clean finish.
Let the sealant dry and cure fully according to the manufacturer’s instructions before reassembling and using the headlights.
As with any maintenance task, if you’re unsure or uncomfortable doing it yourself, it’s always best to reach out to a professional for assistance.
Once the gaps are properly sealed, your headlights should be more resistant to moisture intrusion, safeguarding their performance and longevity.
5. Incorrect Bulb Installation Leads to Condensation
Headlight bulbs, akin to other components, require meticulous installation. Improper installation or replacement of a bulb can often lead to condensation within the headlight assembly.
This is primarily due to the fact that an incorrectly installed bulb can leave gaps, allowing moisture to permeate.
The condensation can cause the bulb to work inefficiently, potentially reducing visibility and posing safety risks.
- Fix: Step-by-Step Guide to Correct Bulb Installation with Proper Seals
To rectify this issue, we must ensure proper bulb installation. Here is a step-by-step guide:
- First, ensure you have the correct bulb for your vehicle’s make and model. Consult your vehicle’s manual or seek advice from an automotive professional if unsure.
- Turn off the vehicle and remove the keys from the ignition for safety.
- Locate the back of the headlight assembly and gently twist the bulb to remove it.
- Carefully insert the new bulb, ensuring not to touch the bulb’s glass with your bare hands, as oils can cause premature bulb failure.
- Pay close attention to the alignment of the bulb and any seals or gaskets. The bulb should fit snugly, with no visible gaps.
- Once the bulb is inserted, secure it by twisting it into place.
- Finally, test your headlights to validate the installation.
Remember, an improperly installed bulb can lead to moisture build-up, causing inefficiencies and potentially reducing the lifespan of your bulb. Consult a professional to ensure optimal bulb installation and performance if in doubt.
6. External Factors
Certain external factors, such as rain, car washing, and driving through puddles, can also lead to moisture inside your headlight assembly.
- Rain: Naturally, vehicles are designed to withstand rain. However, heavy or persistent rainfall can result in water seeping into any existing gaps in the headlight assembly. This is especially common in older vehicles or those with worn-out seals.
- Car Washing: Water can be forced into the headlight assembly while washing your car, especially if you use a high-pressure wash. The water may not evaporate quickly, leading to condensation within the headlights.
- Puddles: Driving through deep puddles can splash water onto the headlights, and moisture may find its way inside if there are gaps in the assembly.
Fix: Tips to Avoid Moisture Entry During These Situations
Avoid directing high-pressure water jets onto the headlights when washing your car. To avoid moisture entry from these external factors, consider the following tips:
- Inspect Seals Regularly: Regularly check the seals around your headlights to ensure they are intact and have not worn out. Replace them as needed.
- Avoid High-Pressure Washing: Avoid directing high-pressure water jets onto the headlights when washing your car. Use a soft cloth and mild detergent instead.
- Safe Driving: Avoid driving through deep puddles or in extremely wet conditions if possible. If you must drive, do so slowly and carefully to minimize water splash.
Always remember that prevention is the best way to avoid dealing with condensation in your headlights. A little attention today can save a lot of trouble tomorrow.
7. Cracked or Damaged Lens
A cracked or damaged headlight lens can significantly increase the likelihood of condensation within the assembly.
Even a minor crack can allow moisture to enter, leading to a foggy appearance that can impair the vehicle’s light output.
This deterioration not only hampers visibility but can also affect the bulb’s lifespan and the headlight’s overall functionality.
- Fix: Replacing the Lens to Restore the Proper Seal
If you detect a crack or damage on your headlight lens, a swift lens replacement is the best course of action. A new lens will restore the integral seal, preventing moisture ingress. Follow the steps below to replace your lens:
- Gather Required Tools: Acquire the necessary tools for lens replacement, which typically include a screwdriver, pliers, and a new lens compatible with your vehicle.
- Remove the Damaged Lens: Carefully remove the damaged lens using the screwdriver. Take care not to damage the surrounding assembly.
- Clean the Headlight Assembly: With the lens removed, clean the inside of the headlight assembly to remove any trapped condensation or debris.
- Install the New Lens: Place the new lens onto the assembly. Ensure it fits snugly and securely.
- Check the Seal: Once the new lens is installed, check the seal to verify it’s tight and secure, ensuring no future water penetration.
By promptly replacing a damaged lens, you’ll minimize the risk of condensation and ensure your headlights function optimally.
8. Clogged or Blocked Drainage Channels
Understanding the function of drainage channels in headlights is crucial for vehicle maintenance.
Drainage channels serve a pivotal role in preventing the accumulation of water inside the headlight assembly.
These channels are designed to guide water from the headlight interior, preventing condensation build-up and subsequent foggy appearance.
However, over time, these channels may become clogged with debris like leaves or dust, blocking the proper flow of water.
- Fix: Properly Cleaning and Maintaining the Drainage System
Regular cleaning and maintenance of the drainage system are essential to ensure your vehicle’s headlights remain clear and functional. Follow the steps outlined below:
- Identify the Drainage Holes: Locate the drainage holes on your vehicle’s headlight assembly. They are usually small holes at the bottom of the assembly.
- Inspect for Blockages: Look for any visible debris that might be obstructing the drainage holes. This could include leaves, dust, or small stones.
- Clean the Drainage Holes: Use a small, soft-bristled brush or a compressed air canister to clean the holes. Be careful not to damage the surrounding areas.
- Rinse and Dry: After cleaning, rinse the area with water and thoroughly dry to prevent any remaining moisture from lingering.
- Check Regularly: Conduct a regular check and clean as necessary, especially after periods of heavy rainfall or if the vehicle is parked outdoors for extended periods.
9. Poor Ventilation
Understanding the role of adequate ventilation in preventing moisture buildup is critical in headlight maintenance.
Ventilation in headlight assemblies prevents moisture from settling and causing foggy appearances or other issues.
The process works by allowing air to move freely in and out of the headlight assembly, discouraging the formation of condensation.
- Fix: Ensuring Effective Ventilation through Proper Vents and Breathers
To ensure the effective ventilation of your headlight assembly, follow the steps below:
- Locate the Ventilation Openings: These are generally located on the top or back of the headlight assembly. They may be covered with a small piece of sponge or have a rubber boot.
- Inspect the Vents for Blockages: These vents can become clogged with dust or other debris over time. Visually inspect them and clear any blockages you find.
- Ensure the Rubber Boots or Sponges are in Good Condition: These components help to prevent larger debris from getting inside while allowing air to flow. Replace them if they’re worn or damaged.
- Verify Air Flow: After cleaning, you should be able to feel a small amount of air flowing in and out of these vents. If airflow seems restricted, a blockage inside the headlight assembly might need professional attention.
- Regular Maintenance: Continue to check and maintain these vents regularly to ensure effective ventilation, especially if you frequently drive in dusty conditions or park outdoors.