There are few things more miserable than driving in summer heat with an air conditioner that blows lukewarm air.
Your shirt sticks to your seat, the sun feels like a spotlight, and you find yourself praying for green lights so you do not have to sit still and cook in your own vehicle.
The good news is that most weak AC systems are not the result of catastrophic compressor failures or expensive leaks. More often, the refrigerant has slowly escaped through tiny seals that harden over time.
The even better news is that you can fix this yourself in under twenty minutes.
This is one of the easiest vehicle maintenance jobs a driver can perform, and when done correctly, it offers an immediate and incredibly satisfying improvement in cabin comfort.
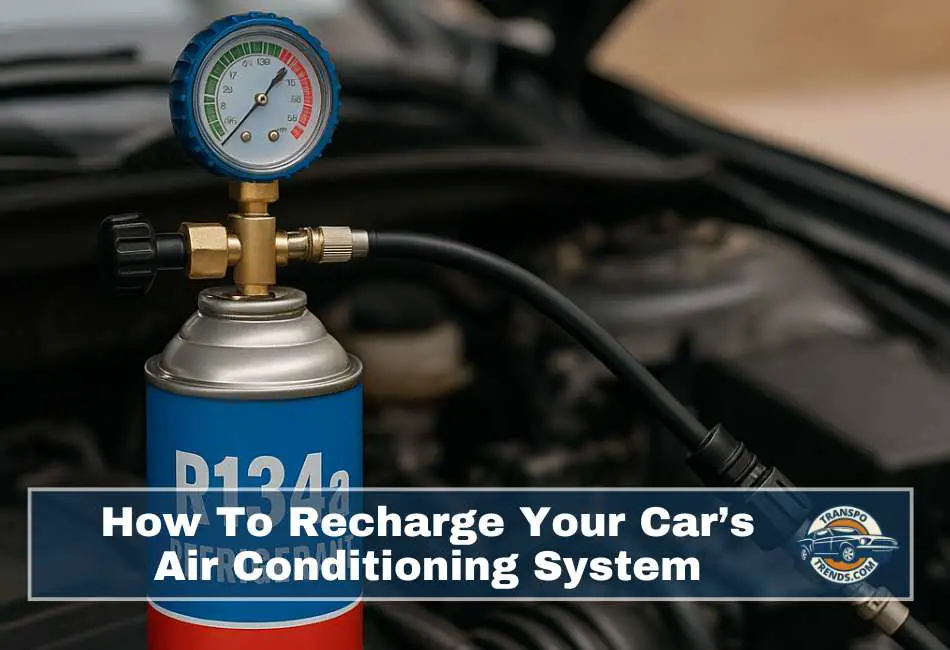
Today’s guide explains exactly how to properly recharge an R134a air conditioning system using a consumer-grade refrigerant kit. These kits contain everything you need: a can of refrigerant, a pressure gauge, a hose, and an adapter that prevents overfilling.
I will take you through the entire process step-by-step, but first let us clear up a few fundamentals about refrigerant and why your AC is no longer cold.
Understanding Your Vehicle’s Refrigerant
Most vehicles manufactured from the mid-1990s until the mid-2010s use R134a refrigerant. Older vehicles used R12, and many modern vehicles now use R1234yf—a different refrigerant with different service ports.
Before you buy anything, you need to confirm which refrigerant your car uses. You can check:
- The owner’s manual
- The sticker under the hood (usually on the radiator support or underside of the hood)
- The compressor label
If your car uses R134a, a do-it-yourself recharge kit is perfectly suitable.
If the AC used to work but gradually became weak over the course of months or a year, the most common cause is a very small leak—usually from a dried O-ring or aging rubber seal. Many recharge kits include a conditioning additive that gently swells these seals to slow the leak. This type of additive is not a glue and will not clog your AC system. It is simply a conditioner for rubber components.
If your system loses its charge rapidly (days or weeks), then professional repair is recommended. But if your system holds a charge for a year or more, a DIY recharge is usually the most reasonable approach.
Step 1: Locate the Low-Pressure Service Port
Your AC system has two service ports:
- A high-pressure port
- A low-pressure port
You must use the low-pressure port. Fortunately, the adapter on recharge kits is designed to only fit the correct one. You cannot accidentally connect to the high-pressure port.
To find the correct port:
- Identify the AC lines running from the compressor.
- Follow the thicker aluminum line (the low-pressure side).
- Look for a plastic cap marked “L” (sometimes unmarked).
Remove the cap and set it aside.
The port is usually located:
- Near the firewall
- On the accumulator
- On the larger of the two AC lines
Once found, confirm that your kit’s coupler fits the port. Push the collar back, press the adapter onto the port, and release. It will snap on securely when aligned correctly.
Step 2: Determine the Outside Temperature
Ambient temperature matters because AC pressure varies based on heat. Your recharge kit will have a gauge with temperature markings.
Find the current outside temperature and rotate the dial so the arrow points to that temperature. This tells you the correct pressure range for recharging.
For example:
- At 90°F ambient temperature, your AC system should stabilize between 45–55 PSI on the low-side gauge.
This range ensures you do not underfill or overfill the system.
Step 3: Start the Engine and Set the Climate Controls
Before charging begins:
- Start the vehicle
- Set the AC to the coldest temperature
- Set the fan to maximum
- Make sure AC mode is activated
- Select fresh air (not recirculation)
- Open all vents fully
Let the car run for a minute or two.
This ensures the AC compressor is cycling.
You can confirm compressor engagement by watching the front plate of the compressor pulley. When the clutch engages, the plate spins with the pulley. When it disengages, the plate stops.
If your compressor is not turning:
- The system may be extremely low on refrigerant
- Or a fuse related to the AC may be blown
A small initial charge may be enough to trigger clutch engagement.
Step 4: Prepare the Refrigerant Can
Put on gloves and safety glasses. Refrigerant can cause frostbite if it sprays on your skin.
Then:
- Unscrew the top of the can to remove the shipping seal.
- Screw the gauge and trigger assembly onto the can to pierce it.
- Shake the can gently to mix the refrigerant and additives.
Now you are ready to connect the hose to the low-pressure port.
Step 5: Attach the Coupler and Begin Charging
Pull the collar back on the coupler, push it onto the low-pressure port, and release the collar so it locks into place.
Make sure the connection is secure.
Look at the gauge.
If the needle is:
- In the red: stop. This indicates a major system issue or overpressure.
- In the white or lower green: proceed.
Now squeeze the trigger to allow refrigerant to enter the system. Sweep the can from the 12-o’clock position to the 3-o’clock position to maintain consistent flow.
Charge for about ten seconds at a time, then release the trigger and check the gauge.
Your goal is to bring the pressure into the correct range for your ambient temperature—typically the middle of the green band.
Repeat this process until the needle settles around the target PSI.
If the pressure rises too quickly, stop immediately.
If the compressor still does not engage, stop and diagnose the electrical side of the system.
Once filled, pull back the coupler’s collar and remove it from the port. Screw the low-pressure cap back on tightly.
Step 6: Check Your AC Temperature
Jump back into the cabin and check the air temperature at the vents.
Most healthy R134a systems produce:
- 38–45°F air at idle
- Even colder air once driving
If your readings fall within this range, your recharge was successful.
Your system should now cool much faster and much more consistently.
Should the AC still feel weak, you may have:
- A failing expansion valve
- A clogged cabin filter
- A weak compressor
- A larger refrigerant leak
But in the majority of cases, a simple recharge resolves the issue for at least a full season.
Summary Table: Quick Reference for R134a AC Recharge
| Step | What To Do | Why It Matters |
|---|---|---|
| 1. Locate Low-Pressure Port | Use only the low-side fitting | Prevents dangerous overpressure |
| 2. Set Gauge to Outside Temperature | Match PSI target to ambient heat | Ensures correct filling |
| 3. Max AC Settings | Coldest temp, max fan, AC on | Forces compressor operation |
| 4. Prepare Can | Shake, secure gauge, wear safety gear | Ensures safe, even refrigerant flow |
| 5. Charge in Short Bursts | Squeeze trigger, check PSI, repeat | Prevents overfilling and protects compressor |
| 6. Confirm Vent Temperature | Look for 38–45°F air | Validates a successful recharge |